Tuesday, 30 November 2010

Baseboard Fabrication 2 (making)

Using the dimensions from the SketchUp model I made, which incorporated the MDF thickness (9mm) into the components, I was able to saw the MDF and assemble the whole thing in less than 2 hours. I made the model to help me find the correct dimensions because I've had serious problems working out side panel lengths in the past when only relying on my ability to calculate them.
As the baseboard is close to a metre square I decided it would be best to include a beam across the middle to support the weight of the model or, at least, prevent the top of from bowing too much. This piece was simply a third side panel tacked and glued into place with wood glue and veneer pins.
I also used filler to solidify the corner joints of the baseboard, something I might find I will regret in the near future as it will get in the way of the feet I intend to put on the box. A rash decision, but hopefully easily rectified.

Baseboard without paved area attached

Underside of baseboard showing supportive beam

Monday, 22 November 2010

Baseboard Fabrication 1 (prep)

Dimensions: 1000mm x 900mm x 62mm
The baseboard I have designed will contain little more than the area of Parliament Square that the venue stands on and a diagonal cut through of the High Street on the north side of the square. The top of the board will stand 62-63mm high (dependent on adhesives and finish). It was originally intended to stand only 60mm but I forgot to allow for the top board representing the square which, is raised above the surface of the road by 2.5mm (representing a rise from road to pavement of 100mm).

SketchUp model of my baseboard. I sketched this design to work out the physical dimensions, making it easier to cut out and assemble.


The area representing the square will be finished in a pale greyish-brown (to show paving slabs/cobbles). I had hoped to laser-etch a cobble texture into the top board but am not able to as the sheet is too large to fit in the laser cutter.
The road surface will be sprayed with either a slightly textured paint or a plain, matte grey which, will represent the tar macadam.
The sides of the board will be clad with a wood veneer. I am, as yet, undecided on which wood I will use but I would like to compliment the colour of the beech I've used for the fins of the venue's walls. I had been thinking along the lines of either a very pale wood - maple, sycamore, birch etc. - or a much darker wood - ebony, walnut, sapele etc. Ebony is unlikely as it's a hard veneer to come across and very expensive. Walnut would compliment the pale, warm and slightly pinkish appearance of the beech very well.

Slotted Curves

The base of the venue - the pieces that hold the wooden fins in place - are proving tricky to fabricate. Working from the architects original drawings, which leave a large amount to the imagination, I drew out new shapes from those included in one of the plan views. The curves work out to be only 5mm x 5mm (high x wide) in 1:40 which, will make them incredibly delicate to work with. The wooden fins will sit in 2mm deep slots that will run all the way along the curves at regular intervals but at varying angles. The fins follow a basic wave shape, starting off at near perpendicular to the outer face and then shaping away from that angle and then back towards it again. The fins also have a staggered lean to them all the way round. The base of each fin lies square to the ground but the tops appear to be square to the parallel sides.
I've chosen to laser cut the curves out of 5mm acrylic, etching (in two passes) the slots and then cutting the curves out in one run.

 Attempt 1 (fail) After doing one etching pass, which took and hour and a half, I ran out of time on the laser. Ed etched locator points in the corners but when we tried to line it up a few days later (when the laser became free again) it didn't etch in to the same points and messed up the sheet of acrylic. I came back the following morning and did it all again with black acrylic. Below are the results. 1.8mm etched slots in a 5mm x 5mm curve. 

 The three etched curves

 Etching

The curves in their entirety

From this point I have sanded the curves smooth, as the sides were grooves from the etched lines. I started with a fine sand paper and then progressed to 320 and then 500 grit wet and dry. I will be spraying them a very dark grey - graphite or charcoal - to match the colour shown in the graphic illustrations from Jonathan Knox.


Wednesday, 3 November 2010

Beech Strips

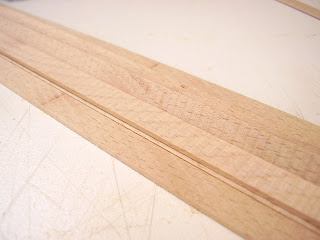
After sawing the 2mm strips of beech on the bandsaw I then have to sand them down to 1mm. This requires, as I've already said, belt sanding on the flat bed sander and then hand-sanding to a smooth finish.
This is what the strips look like after being sawn:

 After being sanded on the belt sander:

 The hand-finished strips:

As some of the beech I've used is very pale compared to some of the other pieces I feel I should even up the colours a little. Do do this I've been testing wood dyes and waxes on the paler wood to create a match to the darker, slightly redder pieces.

Colour matching:

Colour Matching:
Left: original wood colour
Centre: dilution of red dye mixed with liquid wax
Right: (lower end) diluted red dye with overcoat of liquid wax, (upper end) less diluted red dye, no wax.

From my tests I've found the closest match is the dilution of red dye with an overcoat of liquid wax. I had been intending to give all the strips a coat of wax before assembling the model which, will give the wood a warmer and softer appearance. It should also help prolong the life of the wood and stabilise it, preventing excessive warping from atmospheric moisture fluctuations.